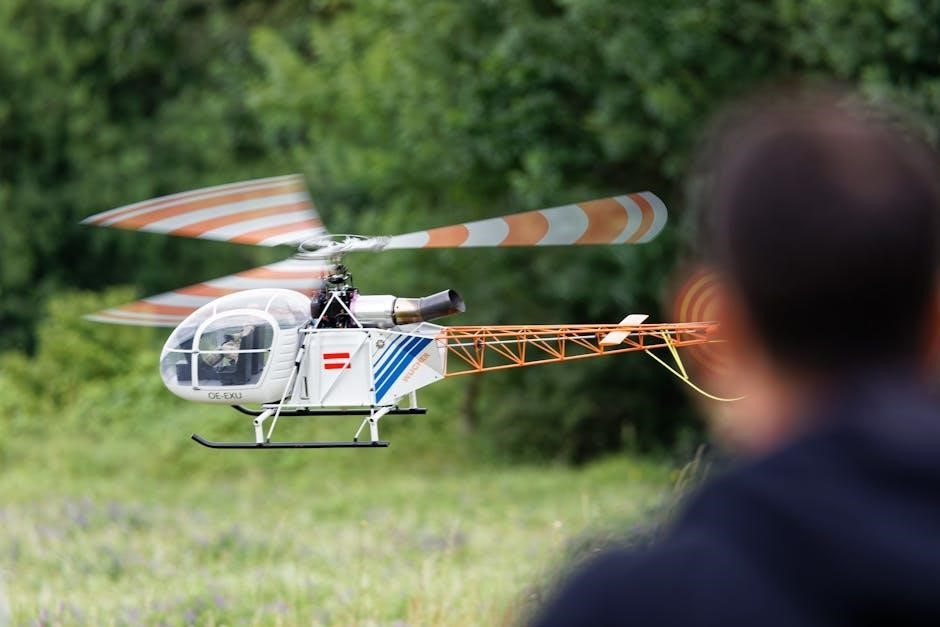
sedgehammer instructions

SedgeHammer is a post-emergent herbicide designed to control nutsedge and other sedges. It is systemic, working through the plant to provide effective weed control.

1.1 What is SedgeHammer?

SedgeHammer is a post-emergent herbicide containing halosulfuron-methyl, specifically designed to control nutsedge and other sedge species. It works systemically, moving through the plant to inhibit growth and eliminate weeds. Effective on both purple and yellow nutsedge, SedgeHammer is commonly used in lawns, gardens, and commercial turf. Its selective action makes it a targeted solution for weed control without harming desirable grasses and plants.

1.2 Importance of Using SedgeHammer for Weed Control

SedgeHammer is crucial for effectively controlling invasive nutsedge, which can outcompete desirable plants and ruin landscapes. Its selective action targets sedge species while sparing grasses, making it an essential tool for maintaining healthy lawns and gardens. Regular use prevents nutsedge from spreading and reduces long-term weed management challenges, ensuring a more sustainable and visually appealing outdoor space.

Application Guidelines

SedgeHammer is vital for controlling invasive nutsedge, which can dominate lawns and gardens, outcompeting desirable plants. Its selective action targets sedge species while sparing grasses, making it essential for maintaining healthy, weed-free outdoor spaces. Regular application prevents nutsedge from spreading and reduces long-term management challenges, ensuring a more sustainable and visually appealing environment.

2.1 Mixing Instructions for SedgeHammer

For effective application, mix 1 scoop of SedgeHammer with up to 2 gallons of water per 1,000 square feet. Water serves as a carrier, so adjust the volume according to spray equipment and coverage needs. Ensure thorough mixing to maintain product efficacy. Always follow label instructions for precise measurements to achieve optimal results and avoid over-application.

2.2 Optimal Timing for Application

Apply SedgeHammer when nutsedge is actively growing, ideally after mowing and allowing the weeds to regrow for 2 days. This ensures optimal absorption and effectiveness. For best results, target young plants that have emerged within the last 6 weeks. Be patient, as visible results may take 1-2 weeks due to the systemic action of the herbicide.

2.3 Application Methods and Equipment

Apply SedgeHammer using a spray tank at 1 scoop per 2 gallons of water per 1,000 sq. ft. Use standard agricultural spraying equipment, ensuring proper pressure for even coverage. It can be mixed with other herbicides like Celsius or Certainty for broader weed control. Water serves as the carrier, so adjust the volume as needed for thorough application. Always follow label instructions for best results.

Effectiveness of SedgeHammer

SedgeHammer is highly effective against nutsedge, with visible results in 1-2 weeks. It targets the entire plant, including underground tubers, ensuring long-term control when applied correctly.

3.1 Why SedgeHammer is Effective Against Nutsedge

SedgeHammer is highly effective due to its systemic action, penetrating the entire plant, including roots and tubers, ensuring complete eradication. It targets nutsedge specifically, killing it without harming most turfgrasses when used correctly. This selective herbicide works best on young, actively growing weeds, making it a reliable solution for long-term nutsedge control in lawns and landscapes.

3;2 How Long Does it Take to See Results?

Results from SedgeHammer are typically visible within one to two weeks after application. The herbicide works systemically, moving through the plant to the roots and tubers, which takes time. For tougher infestations, a second application may be necessary. Patience is key, as full control of nutsedge can take several weeks to achieve effectively.

Safety Precautions

When using SedgeHammer, wear gloves, goggles, and long clothing to minimize skin exposure. Avoid application during windy or wet conditions to prevent drift and ensure safe usage.

4.1 Personal Protective Equipment (PPE) Requirements

When applying SedgeHammer, wear long sleeves, long pants, closed-toe shoes, chemical-resistant gloves, goggles, and a face mask to prevent skin and eye exposure. Avoid wearing short or loose clothing that may allow contact with the herbicide. Ensure all PPE meets the label’s recommendations for safety and protection during application to minimize health risks.

4.2 Environmental Impact and Precautions

SedgeHammer may impact aquatic life if applied near water sources. Avoid drift or runoff into ponds, lakes, or streams. Prevent application during heavy rain or strong winds to reduce environmental contamination. Follow label guidelines to minimize exposure to non-target plants and wildlife, ensuring responsible use to protect ecosystems while controlling weeds effectively.

4.3 Safe Disposal of Unused Product

Dispose of unused SedgeHammer and its container according to local, state, and federal regulations. Do not pour down drains or waterways, as it may harm aquatic life. Check with hazardous waste collection facilities for proper disposal methods. Ensure the container is thoroughly rinsed and recycled if permitted. Always follow safety precautions to minimize environmental impact.

Compatibility with Other Herbicides

SedgeHammer can be mixed with other herbicides for broad-spectrum weed control. Always check the product label for compatibility. Mixing different modes of action helps reduce resistance development in weeds.

5.1 Can SedgeHammer be Mixed with Other Products?

SedgeHammer can be tank-mixed with other herbicides for broad-spectrum weed control. Examples include mixing with Celsius or Certainty. Always check the product label for compatibility. Mixing different modes of action helps reduce resistance development in weeds and improves overall efficacy. Ensure proper tank mixing procedures and follow all label instructions for safe and effective application.

5.2 Recommended Tank Mixtures for Broad-Spectrum Weed Control

SedgeHammer can be effectively tank-mixed with herbicides like Celsius or Certainty for enhanced weed control. These combinations target a wide range of weeds while maintaining selectivity. Always follow label instructions for proper mixing ratios and application guidelines. Mixing with other modes of action helps control diverse weed species and reduces the potential for resistance development in the target area.

Target Weeds and Non-Target Effects

SedgeHammer targets nutsedge, including purple and yellow species, providing effective control. It is selective, minimizing harm to non-target grasses and plants when applied correctly.

6.1 Types of Weeds Controlled by SedgeHammer

SedgeHammer effectively controls both purple and yellow nutsedge, as well as other sedge species. It targets actively growing weeds, providing visible results within 1-2 weeks. Ideal for lawns, it helps eliminate persistent sedges without harming desirable grasses when applied as directed.

6.2 Impact on Non-Target Grasses and Plants

SedgeHammer is selective and generally safe for non-target grasses like Bermuda and Buffalo grass when applied correctly. However, improper use or application during stress can harm desirable plants. It’s crucial to follow label instructions to minimize risks to non-target vegetation and ensure optimal weed control without damaging surrounding plants or lawns.

Application Frequency and Timing

SedgeHammer should be applied when nutsedge is actively growing, typically after new growth has emerged. One application is usually sufficient, but timing is critical for best results.

7.1 When to Apply SedgeHammer for Best Results

Apply SedgeHammer when nutsedge is actively growing, typically in late spring or early summer. Ensure weeds have reached 5cm of new growth for optimal absorption. Apply two days after mowing to allow weeds to reopen, maximizing effectiveness. Avoid application before heavy rain and choose a dry, calm day for best results. Be patient, as visible results may take 1-2 weeks.

7.2 How Often to Reapply for Persistent Weeds

Reapply SedgeHammer every 4-6 weeks if nutsedge regrowth occurs, ensuring thorough control. A single application often suffices, but persistent infestations may require follow-up treatments. Always follow label instructions to avoid overuse and prevent resistance. Monitor weed activity and adjust reapplication timing based on growth patterns and treatment effectiveness.

Handling and Storage

Store SedgeHammer in a cool, dry place away from direct sunlight. Keep out of reach of children and pets. Ensure the container is tightly sealed. Always follow label instructions for proper handling and storage to maintain product effectiveness and safety.

8.1 Proper Storage Conditions

SedgeHammer should be stored in a cool, dry place away from direct sunlight and moisture. Keep the container tightly sealed to prevent contamination. Store out of reach of children and pets. Ensure the storage area is well-ventilated and avoid extreme temperatures. Follow the label instructions for specific storage recommendations to maintain product effectiveness and safety. Proper storage conditions help preserve the herbicide’s potency and prevent degradation over time.

8.2 Handling Precautions to Avoid Accidents

When handling SedgeHammer, wear long sleeves, gloves, goggles, and a face mask to avoid skin and eye contact. Avoid inhaling the product or working in windy conditions. Keep the area clear of pets and children. If spilled, contain the material and clean it up immediately using absorbent materials. In case of skin contact, wash thoroughly with soap and water. For eye exposure, flush with water for at least 15 minutes and seek medical attention if irritation persists. Proper handling ensures safety and prevents accidents during application or storage.

Cost-Effectiveness

SedgeHammer is a cost-effective solution for nutsedge control due to its high efficacy and reduced application frequency, making it a valuable investment for long-term weed management.

9.1 Is SedgeHammer Worth the Investment?

SedgeHammer is a cost-effective solution for controlling nutsedge, offering long-term benefits. Its high efficacy reduces the need for frequent applications, saving time and resources. It selectively targets sedge without harming most grasses, making it a valuable choice for lawn care. Compared to manual removal or repeated treatments, SedgeHammer provides a more efficient and sustainable option, ensuring your lawn remains weed-free with minimal effort.

9.2 Comparing Costs with Alternative Weed Control Methods

SedgeHammer is often more cost-effective than manual removal or repeated use of less potent herbicides. Alternative methods, like frequent mowing or digging, can be labor-intensive and costly over time. Compared to other selective herbicides, SedgeHammer offers competitive pricing with superior efficacy, making it a financially sound choice for long-term sedge control and lawn maintenance;

User Reviews and Feedback

Users report mixed experiences with SedgeHammer, praising its effectiveness on nutsedge but noting variable results and the need for patience, as it may take weeks to show impact.

10.1 Positive Experiences with SedgeHammer

Many users praise SedgeHammer for its effectiveness against nutsedge, noting significant reduction in weed growth within weeks. Its systemic action and ease of application make it a favorite for lawn care enthusiasts. Several reviewers highlight its compatibility with various grass types, including Bermuda and Centipede, without causing harm. Others appreciate its long-term results, calling it a worthwhile investment for maintaining a weed-free lawn.

10.2 Common Complaints and Challenges

Some users report disappointment with SedgeHammer despite proper application, citing inconsistent results. Others mention the product’s slow action, requiring weeks to see improvements. A few note potential damage to non-target plants if not applied carefully. Additionally, the need for precise mixing and timing can be challenging for inexperienced users, highlighting the importance of following instructions closely to achieve desired outcomes.

Troubleshooting Common Issues

Common issues with SedgeHammer include inconsistent results and slow action. Ensure proper application, reapply as needed, and avoid spraying non-target plants. Follow instructions closely to avoid errors.

11.1 Why SedgeHammer May Not Be Working

Common reasons SedgeHammer may not work include incorrect mixing ratios, application to mature plants, or insufficient water volume. Improper timing, such as spraying dormant plants, reduces efficacy. Overlooking reapplication for persistent weeds or applying during stress conditions like extreme heat can also limit results. Ensure label instructions are followed precisely for optimal effectiveness.

11.2 Solving Application Errors

To address application errors, ensure proper mixing ratios and adequate water volume as per label instructions. Recalibrate equipment to avoid under- or over-application. Reapply as directed, allowing at least one week between treatments. Avoid spraying during extreme heat or stress. Correct timing and proper techniques can enhance efficacy and resolve issues related to poor results.

SedgeHammer vs. Alternative Herbicides

SedgeHammer is highly effective against nutsedge, offering superior control compared to alternative herbicides. Its systemic action targets the entire plant, making it more efficient for specific sedge species.

12.1 Comparing Efficacy with Other Sedge Control Products

SedgeHammer is a top choice for sedge control due to its high efficacy and selective nature. Unlike other herbicides, it targets the entire plant, including underground nutlets, ensuring long-term results. While alternatives like Celsius and Certainty offer broad-spectrum control, SedgeHammer’s specificity makes it ideal for nutsedge without harming desirable grasses. It can also be tank-mixed with other products for enhanced weed management, though its standalone effectiveness often suffices for targeted sedge control.

12.2 Unique Features of SedgeHammer

SedgeHammer stands out as a systemic, post-emergent herbicide specifically designed to target nutsedge. It effectively kills the entire plant, including underground nutlets, ensuring long-term control. Its selective nature minimizes harm to desirable grasses, making it ideal for lawn care. Additionally, SedgeHammer can be tank-mixed with other herbicides for broad-spectrum weed control. Its unique formulation reduces environmental impact while providing cost-effective, targeted sedge management.

Environmental Considerations

SedgeHammer is a systemic, post-emergent herbicide with reduced environmental impact. It selectively targets nutsedge, minimizing harm to beneficial plants and wildlife, offering a cost-effective solution.

13.1 Impact on Beneficial Plants and Wildlife

SedgeHammer is selective, primarily targeting nutsedge while minimizing harm to beneficial plants and wildlife. Its systemic action reduces toxicity to non-target species, making it safer for the environment compared to broad-spectrum herbicides. However, it’s essential to follow application instructions to avoid unintended ecological disruption and protect pollinators and other wildlife that may be indirectly affected by weed control efforts.

13.2 Reducing Environmental Risk

To minimize environmental impact, apply SedgeHammer as directed, avoiding overspray and drift onto non-target plants or water sources. Spray during calm conditions and avoid application before rain to prevent runoff. Properly dispose of unused product and packaging to reduce contamination risks. Following label guidelines ensures effective weed control while safeguarding beneficial vegetation and wildlife habitats from unintended exposure.

SedgeHammer and Lawn Care

SedgeHammer is a valuable tool for lawn care, helping to eliminate weeds like nutsedge, allowing grass to grow healthily without competition from invasive plants.

14.1 Integrating SedgeHammer into Your Lawn Maintenance Routine

For effective lawn care, apply SedgeHammer two days after mowing to maximize weed absorption. Mix with water as directed and spray on actively growing nutsedge with at least 5cm of new leaf growth. This systemic herbicide works through the plant, ensuring long-term control. Regular application as part of your maintenance routine helps maintain a healthy, weed-free lawn.

14.2 Rehabilitating Your Lawn After Treatment

After applying SedgeHammer, allow the product to work fully before addressing lawn recovery. Wait 1-2 weeks to ensure all targeted weeds are controlled. Assess any bare spots or damaged areas and overseed with appropriate grass species. Fertilize lightly to promote healthy regrowth. Maintain proper mowing and watering schedules to support lawn recovery and prevent future weed infestations.

Frequently Asked Questions

  • How often should SedgeHammer be applied for best results?
  • Can SedgeHammer be mixed with other herbicides?
  • How long does it take to see results after application?

15.1 General Inquiries About SedgeHammer Use

Common questions include how SedgeHammer works, its effectiveness on nutsedge, and application frequency. Users often ask if it can be mixed with other herbicides and how long it takes to see results. It is selective for sedges, making it safe for certain grasses, and is systemic, meaning it works internally in the plant. Patience is key as results may take weeks to appear.

15.2 Addressing Common Concerns

Users often worry about mixing SedgeHammer with other products and its environmental impact. Some express frustration when results take time, while others question its effectiveness on different sedge types. Proper application timing and following label instructions are emphasized to ensure success and minimize risks to beneficial plants and wildlife, aligning with safe usage practices.

SedgeHammer is a proven solution for effective nutsedge control. Follow label instructions for optimal results and to ensure safe, efficient weed management.

16.1 Final Thoughts on Using SedgeHammer

SedgeHammer is a reliable herbicide for controlling tough sedges like nutsedge. Its systemic action ensures effective results when applied correctly. Patience is key, as visible outcomes may take weeks. Always follow label instructions for mixing and application to maximize efficacy and safety. Proper use helps protect the environment and ensures long-term weed control. SedgeHammer is a valuable tool for maintaining healthy, weed-free landscapes.

16.2 Encouragement for Proper Usage

Proper use of SedgeHammer ensures effective weed control while minimizing environmental impact. Always follow label instructions for mixing and application to achieve the best results. Be patient, as visible improvements may take time. Consistent effort and adherence to guidelines will help maintain a healthy, weed-free landscape. Remember, responsible application is key to both efficacy and safety.

cozy earth washing instructions

Cozy Earth products, crafted from bamboo and silk, require gentle care․ Washing in cold water with mild detergent and avoiding fabric softeners ensures longevity and softness․

1․1 Overview of Cozy Earth Products

Cozy Earth offers a range of luxury bedding, loungewear, and sleepwear crafted from premium materials like bamboo and silk․ Known for their softness, breathability, and temperature-regulating properties, these products provide exceptional comfort․ Bamboo fabrics are lightweight and moisture-wicking, while silk adds a touch of elegance and durability․ The brand emphasizes eco-friendly practices and sustainable production․ Proper care is essential to maintain the quality and longevity of these materials, ensuring they remain soft and comfortable for years to come․ Understanding the unique needs of these fabrics is key to preserving their natural benefits․

1․2 Importance of Proper Care for Cozy Earth Fabrics

Proper care for Cozy Earth fabrics is crucial to maintain their softness, breathability, and durability․ Bamboo and silk materials, while luxurious, are sensitive to high temperatures, harsh chemicals, and aggressive washing cycles․ Improper care can lead to shrinkage, loss of softness, or even damage to the fabric․ Following the recommended washing instructions ensures the longevity of your Cozy Earth products․ Neglecting these guidelines may result in pilling, discoloration, or a breakdown of the fabric’s natural properties․ By adhering to the care instructions, you preserve the integrity and performance of your investment, ensuring optimal comfort and satisfaction for years to come․

Materials Used in Cozy Earth Products

Cozy Earth products feature premium materials like bamboo, silk, and sustainable blends, known for their softness, breathability, and durability, ensuring comfort and eco-friendly performance․

2․1 Bamboo Fabric

Bamboo fabric is renowned for its exceptional softness, breathability, and moisture-wicking properties․ Cozy Earth utilizes bamboo viscose, a sustainable material, to craft bedding and apparel․ It regulates temperature, keeping you cool in summer and warm in winter․ Bamboo fabric is also eco-friendly, requiring less water and pesticides compared to traditional materials․ Its natural antimicrobial properties inhibit odor-causing bacteria, ensuring freshness․ Proper care involves washing in cold water with a mild detergent, avoiding fabric softeners and bleach, to maintain its softness and durability over time․ This makes bamboo a premium choice for comfort and sustainability․

2․2 Silk Fabric

Silk fabric, known for its smooth, luxurious feel, is a key material in Cozy Earth products․ It provides natural temperature regulation, keeping you cool in summer and warm in winter․ Silk is hypoallergenic and gentle on skin, making it ideal for sensitive individuals․ To maintain its quality, silk should be washed in cold water using a mild detergent․ Fabric softeners and bleach should be avoided, as they can damage the fabric․ Line drying or using a low-heat setting is recommended․ Proper care ensures silk remains soft, lustrous, and durable, offering long-lasting comfort and elegance in Cozy Earth bedding and apparel․

2․3 Blends and Other Materials

Cozy Earth also utilizes fabric blends and other materials to enhance comfort and durability․ These blends often combine bamboo with synthetic fibers for added stretch and resilience․ While silk remains a premium choice, other materials like bamboo viscose are used for softness and breathability․ Washing instructions for blends typically align with those for bamboo and silk—cold water, gentle detergent, and avoiding fabric softeners or bleach․ Proper care ensures these materials retain their texture and performance․ Cozy Earth’s use of diverse fabrics caters to various preferences, ensuring a balance between luxury, practicality, and eco-friendliness in their bedding and apparel collections․

Pre-Wash Routine

Begin by checking care labels, sorting fabrics, and pre-treating stains․ This step ensures optimal cleaning while preserving the quality of your Cozy Earth products․

3․1 Checking Care Labels

Always begin by examining the care labels on your Cozy Earth products․ These labels provide specific instructions tailored to the fabric type, ensuring optimal care․ For bamboo and silk items, labels typically advise machine washing in cold water with a gentle detergent, avoiding fabric softeners and bleach․ Pre-treating stains gently before washing is also recommended․ Neglecting these guidelines can lead to damage or discoloration․ By following the care labels, you preserve the softness, texture, and longevity of your Cozy Earth fabrics․ This step is crucial for maintaining the quality and performance of your bedding and apparel․

3․2 Sorting and Preparation

Sorting and preparation are essential steps before washing Cozy Earth products․ Separate bamboo and silk fabrics from other laundry to prevent damage or color transfer․ Always turn items inside out to protect delicate fabrics during washing․ Check for loose buttons or embellishments and secure them if necessary․ Avoid overloading the washing machine, as this can cause friction and pilling․ For colored items, sort them with similar shades to prevent dye bleeding․ Gently remove any loose debris or lint before washing to ensure a clean cycle․ Proper preparation ensures your Cozy Earth products remain soft and intact after washing․

3․3 Pre-Treatment of Stains

Pre-treating stains on Cozy Earth products is crucial for effective removal without damaging the fabric․ Identify the type of stain and apply a gentle stain remover or mild detergent directly to the affected area․ Gently agitate the fabric with your fingers or a soft brush to work in the treatment․ Avoid harsh chemicals or abrasive scrubbing, as this can harm bamboo or silk fibers․ Let the treatment sit for 10–15 minutes before washing․ For protein-based stains like blood, cold water and mild enzymes are recommended․ Never soak Cozy Earth fabrics, as this can weaken their structure․ Pre-treatment ensures stains are removed without compromising fabric integrity․

Washing Process

Cozy Earth products should be machine washed in cold water using a gentle cycle and mild detergent․ Avoid fabric softeners and bleach to maintain fabric integrity․

4․1 Machine Washing vs․ Hand Washing

Cozy Earth products can be washed using either machine or hand washing methods, but machine washing is generally more convenient․ For machine washing, use a gentle cycle with cold water to prevent damage․ High spin speeds can cause bamboo and silk fabrics to clump, so a low RPM setting is recommended․ Hand washing is ideal for delicate items or those requiring extra care․ Submerge the fabric in cold water with a mild detergent, gently agitate, then rinse thoroughly․ Avoid wringing or twisting, as this can stretch or damage the material․ Always avoid fabric softeners and bleach to preserve softness and color integrity․

4․2 Recommended Water Temperature

For Cozy Earth products, cold water is highly recommended to maintain fabric integrity and prevent shrinkage․ Washing in cold water helps preserve the softness and color of bamboo and silk materials․ Hot water can cause fibers to weaken and colors to fade, while cold water gently cleans without damaging the fabric․ This temperature setting also supports energy efficiency, aligning with eco-friendly practices․ Always ensure the water is cold, especially for delicate items like silk pillowcases or bamboo comforters, to uphold their quality and extend their lifespan․

4․3 Detergent Selection

Choosing the right detergent is crucial for maintaining the quality of Cozy Earth products․ Opt for a mild, gentle detergent that is free from harsh chemicals, bleach, or fabric softeners․ These additives can damage bamboo and silk fibers, causing them to lose their softness or structure․ Eco-friendly detergents are highly recommended, as they are designed to preserve the natural texture and breathability of the fabrics․ Avoid using heavy-duty or abrasive detergents, as they may harm the materials․ Always follow the detergent manufacturer’s instructions for dosage to ensure optimal cleaning without over-saturating the fabrics․

4․4 Avoiding Fabric Softeners and Bleach

Avoiding fabric softeners and bleach is essential for preserving the quality of Cozy Earth products․ Fabric softeners can leave a residue on bamboo and silk fibers, reducing their natural softness and breathability․ Similarly, bleach can damage or discolor these delicate materials, weakening their structure over time․ To maintain the integrity and softness of your Cozy Earth items, stick to gentle, chemical-free cleaning agents․ This ensures the fabrics remain luxurious, breathable, and durable for years to come․

Drying Instructions

Cozy Earth products can be machine dried on a delicate cycle using cold air to prevent shrinkage and maintain softness․ Air drying is also recommended, especially for bamboo and silk items, to preserve their natural texture and prevent clumping․ Avoid high heat, as it can damage the fibers․ For optimal results, tumble dry on low or use dryer balls to reduce static and maintain the luxurious feel of your Cozy Earth bedding and apparel․

5․1 Machine Drying vs․ Air Drying

Cozy Earth products can be machine dried on a delicate cycle with cold air to prevent shrinkage and maintain softness․ However, air drying is recommended for bamboo and silk items to preserve their natural texture and prevent clumping․ Machine drying may cause fibers to tangle or lose softness if not done carefully․ For machine drying, use a low heat setting and remove items as soon as the cycle ends․ Air drying allows fabrics to retain their breathability and luxurious feel․ Both methods are effective, but air drying is preferable for maintaining the integrity of bamboo and silk fabrics․

5․2 Recommended Dryer Settings

For Cozy Earth products, use a low heat or delicate dryer setting to prevent shrinkage and maintain fabric softness․ Avoid high heat, as it can damage bamboo and silk fibers․ If available, use a gentle or wool dryer ball setting to minimize friction and static․ Remove items immediately after the cycle to prevent wrinkles and creases․ Using wool dryer balls can help reduce drying time and soften fabrics naturally․ Always check the care label for specific instructions, as some products may require air drying․ Proper dryer settings ensure longevity and preserve the luxurious feel of Cozy Earth materials․

5․3 Using Dryer Balls

Using dryer balls with Cozy Earth products is highly recommended to enhance drying efficiency and maintain fabric quality․ Wool dryer balls are ideal as they reduce static, soften fabrics, and shorten drying time without leaving chemical residues․ Unlike fabric softeners, dryer balls are eco-friendly and gentle on bamboo and silk fibers․ Place 2-3 dryer balls in the machine to help separate fabrics and improve airflow․ This method prevents clumping and ensures even drying․ For best results, avoid using plastic dryer balls, as they may generate static․ Regular use of dryer balls helps preserve the softness and breathability of Cozy Earth materials․

Special Care for Specific Products

Cozy Earth’s bamboo and silk comforters, pillowcases, and crib sheets require gentle care․ Machine wash cold with mild detergent, avoiding fabric softeners and bleach for optimal longevity․

6․1 Bamboo and Silk Comforters

Cozy Earth bamboo and silk comforters require gentle care to maintain their softness and durability․ Machine wash in cold water using a mild detergent, avoiding fabric softeners and bleach․ To prevent clumping, avoid high-spin cycles․ Air drying is recommended, but if using a dryer, choose a low heat setting․ For optimal results, use dryer balls to maintain softness․ Regular washing helps preserve the comforter’s quality and breathability․ Always follow the care label instructions for best outcomes and to ensure the longevity of your Cozy Earth comforter․

6․2 Bamboo and Silk Pillowcases

Cozy Earth bamboo and silk pillowcases are designed for softness and durability․ Wash them in cold water using a gentle detergent, avoiding fabric softeners and bleach to preserve their texture․ Machine washing is acceptable, but high-spin cycles should be avoided to prevent damage․ Air drying is recommended to maintain their breathability and softness․ For optimal care, wash pillowcases with similar colors to prevent dye transfer․ Regular washing helps keep them clean and hygienic, while proper drying ensures they remain luxurious and comfortable; Follow these steps to maintain the quality and extend the life of your bamboo and silk pillowcases․

6․3 Bamboo and Silk Crib Sheets

Cozy Earth bamboo and silk crib sheets are crafted for softness and breathability, perfect for a baby’s sensitive skin․ Wash them in cold water using a gentle detergent, avoiding fabric softeners and bleach to maintain their texture․ Machine washing is recommended, but ensure a low-spin cycle to prevent damage․ Air drying is ideal to preserve softness and prevent shrinkage․ Regular washing keeps crib sheets hygienic while maintaining their luxurious feel․ Proper care ensures durability and comfort for your baby, making Cozy Earth crib sheets a long-lasting, eco-friendly choice for nursery bedding․

Handling Common Issues

Prevent shrinkage by using cold water and low-spin cycles․ Maintain softness by avoiding fabric softeners․ Address color fading by washing similar colors together and avoiding bleach․

7․1 Preventing Shrinkage

To prevent shrinkage, wash Cozy Earth products in cold water using a gentle detergent․ Avoid high-spin cycles, as they can damage bamboo and silk fibers․ Air drying is recommended, as machine drying can cause shrinkage․ Use dryer balls if necessary to reduce friction․ Never use bleach or fabric softeners, as they can weaken the fabric․ Following these care instructions ensures the longevity and softness of your Cozy Earth bedding and apparel․ Proper care maintains the quality and prevents unnecessary damage․

7․2 Maintaining Softness

To maintain the softness of Cozy Earth products, wash them in cold water with a gentle detergent․ Avoid using fabric softeners or bleach, as they can strip the fabric of its natural softness․ Air drying is recommended, as machine drying can cause friction and reduce softness․ If machine drying is necessary, use a low heat setting and consider adding dryer balls to minimize friction․ Regular washing with the right care ensures the bamboo and silk fibers retain their luxurious feel․ Proper maintenance keeps Cozy Earth bedding and apparel soft and comfortable for years․

7․3 Avoiding Color Fading

To prevent color fading, wash Cozy Earth products in cold water using a mild detergent․ Avoid using bleach or fabric softeners, as they can damage fibers and cause colors to dull․ Washing similar colors together helps preserve vibrancy․ Air drying is recommended, as high heat from machine drying can accelerate fading․ For machine drying, use a low heat setting․ Turning items inside out before washing can also protect colors․ Regular care following these guidelines ensures Cozy Earth fabrics retain their rich hues and stay vibrant for a longer period․

Maintenance Tips

Regular washing and proper storage maintain Cozy Earth products’ quality․ Wash items in cold water with mild detergent, avoiding bleach and fabric softeners․ Air dry or use low heat settings to preserve softness and texture․ Store fabrics in a cool, dry place to prevent moisture buildup․ Spot clean stains promptly to avoid permanent damage․ Following these care routines ensures longevity and maintains the luxurious feel of Cozy Earth bedding and apparel․

8․1 Regular Washing Schedule

Cozy Earth products should be washed regularly to maintain hygiene and softness․ Bedding and apparel can be washed every 1-2 weeks, depending on usage․ Always use cold water and a gentle detergent to preserve the fabric’s integrity․ Avoid using fabric softeners or bleach, as they can degrade the material over time․ For best results, wash items separately or with similar fabrics to prevent friction and pilling․ After washing, remove promptly from the dryer to prevent wrinkles and creases․ Regular washing helps maintain the breathability and moisture-wicking properties of bamboo and silk fabrics, ensuring optimal comfort and durability․

8․2 Storage Tips

Proper storage is essential to maintain the quality of Cozy Earth products․ Store items in a cool, dry place away from direct sunlight to prevent fading or damage․ Fold or hang fabrics neatly to avoid creases and wrinkles․ Use breathable storage containers or cloth bags to maintain airflow and prevent moisture buildup․ Avoid stacking heavy items on top of delicate fabrics․ For seasonal items, ensure they are clean and dry before storage to prevent mold or mildew․ Consider using drawer dividers to organize and protect your Cozy Earth products, ensuring they remain soft and pristine for years to come․

8․3 Spot Cleaning

For minor stains or spills, spot cleaning is an effective way to maintain Cozy Earth products․ Gently blot the area with a clean, damp cloth to remove excess residue․ Avoid rubbing, as it may damage the fabric․ Apply a small amount of mild detergent directly to the stain, working it in gently with your fingers or a soft brush․ Rinse with cold water and allow the item to air dry․ Avoid using bleach or harsh chemicals, as they can harm the bamboo or silk fibers․ Regular spot cleaning helps preserve the softness and longevity of your Cozy Earth items․

Eco-Friendly Practices

Eco-friendly practices include using cold water, mild detergents, and avoiding fabric softeners․ These methods conserve energy, reduce chemical use, and promote sustainable care for Cozy Earth products․

9․1 Energy-Efficient Washing

Energy-efficient washing involves using cold water, which preserves fabric quality and reduces energy consumption․ Choose gentle, eco-friendly detergents to minimize environmental impact․ Avoid fabric softeners and bleach, as they can harm fabrics and the environment․ Opting for shorter wash cycles or energy-efficient washing machines certified by Energy Star can further reduce energy use․ Air drying or using low-heat settings in the dryer also saves energy․ These practices help maintain the softness and durability of Cozy Earth products while promoting sustainable care․ By adopting these habits, you contribute to a more eco-conscious lifestyle;

9․2 Using Eco-Friendly Detergents

Using eco-friendly detergents is essential for maintaining the quality of Cozy Earth products while reducing environmental impact․ Opt for biodegradable, phosphate-free detergents that are gentle on fabrics and the planet․ Avoid harsh chemicals like bleach or fabric softeners, as they can damage bamboo and silk fibers․ Eco-friendly detergents are specifically designed to preserve the softness and breathability of Cozy Earth materials․ They also help prevent residue buildup, ensuring your bedding remains fresh and comfortable․ By choosing sustainable detergents, you align with Cozy Earth’s commitment to eco-conscious practices, extending the life of your products and supporting environmental health․

9․3 Reducing Waste

Reducing waste is a key aspect of eco-friendly practices when caring for Cozy Earth products․ Consider purchasing detergent in bulk or using concentrated formulas to minimize packaging․ Recycling laundry detergent containers and product packaging further supports sustainability․ Additionally, donating gently used Cozy Earth items or repurposing them as cleaning rags helps reduce landfill waste․ Avoiding single-use products and opting for reusable alternatives, like dryer balls, also contributes to a greener lifestyle․ By adopting these habits, you align with Cozy Earth’s eco-conscious values, preserving both your products and the environment for years to come․

User Testimonials and Reviews

Cozy Earth products have received thousands of 5-star reviews, with customers praising their softness, durability, and eco-friendly qualities․ Celebrity endorsements and satisfied users highlight exceptional comfort and value․

10․1 Customer Experiences

Customers rave about Cozy Earth products, praising their exceptional softness and durability․ Many highlight how following the washing instructions ensures long-lasting quality․ Satisfied users share experiences of improved sleep comfort and ease of care․ The eco-friendly materials and gentle washing process are frequently commended․ Some customers mention washing their Cozy Earth items multiple times without any loss of softness or texture․ Celebrity endorsements and glowing reviews underscore the brand’s reputation for luxury and comfort․ Overall, the positive feedback reflects a strong satisfaction with both the products and the care guidelines provided․

10․2 Common Feedback

Common feedback highlights the exceptional softness and breathability of Cozy Earth products․ Many users praise the ease of following the washing instructions, which maintain the fabric’s quality․ Customers often note improved sleep comfort due to the temperature-regulating properties․ Some mention that avoiding fabric softeners and bleach is key to preserving softness․ A few users report slight shrinkage when not following drying guidelines․ Overall, the feedback emphasizes the durability and luxury feel of Cozy Earth products when properly cared for․ The brand’s eco-friendly materials and gentle care process are frequently commended by satisfied customers․

10․3 Tips from Satisfied Users

Satisfied users share valuable tips for maintaining Cozy Earth products․ Many recommend washing in cold water with a gentle detergent to preserve softness․ Avoiding fabric softeners and bleach is strongly advised to prevent damage․ Users also suggest using a delicate cycle and avoiding high heat during drying․ Some prefer air drying to maintain the fabric’s breathability․ Following the care instructions closely is emphasized for longevity․ Additionally, using eco-friendly detergents and dryer balls is recommended for optimal results․ These practices ensure the products remain soft, durable, and comfortable, enhancing overall satisfaction with Cozy Earth’s luxury bedding and loungewear․

Proper care ensures Cozy Earth products remain soft and durable․ Use cold water, gentle detergent, and avoid fabric softeners for optimal results․ Eco-friendly practices enhance longevity and satisfaction․

11․1 Summary of Key Points

Cozy Earth washing instructions emphasize gentle care to maintain softness and durability․ Wash in cold water with mild detergent, avoiding fabric softeners and bleach․ Air drying is recommended to prevent shrinkage and preserve texture․ For machine drying, use low heat and dryer balls․ Regular washing with eco-friendly detergents helps maintain quality․ Proper care ensures longevity, while spot cleaning and storage tips enhance fabric health․ Following these guidelines ensures Cozy Earth products remain luxurious and comfortable, aligning with eco-conscious practices for sustainable use․

11․2 Final Tips for Longevity

To ensure your Cozy Earth products last, always wash them in cold water with a mild detergent, avoiding fabric softeners and bleach․ Air drying is ideal, but if machine drying, use low heat and dryer balls to prevent clumping․ Regular washing with eco-friendly detergents maintains softness and breathability․ Spot clean stains promptly and store items in a cool, dry place․ Avoid over-drying, as this can cause shrinkage or loss of texture․ By following these care tips, you’ll enjoy the luxurious feel and durability of Cozy Earth fabrics for years to come, while supporting sustainable practices․

cub cadet blade replacement instructions

Replacing Cub Cadet mower blades is essential for maintaining cutting performance and safety․ Proper blade maintenance ensures clean cuts, prevents damage, and extends mower lifespan․ Always use OEM blades for optimal results․

Overview of Cub Cadet Blade Replacement

Cub Cadet blade replacement involves removing the mower deck, taking out the old blades, and installing new ones․ It’s a straightforward process that requires basic tools and attention to safety․ Proper installation ensures optimal cutting performance and prevents damage to the mower․ Always use genuine Cub Cadet blades for compatibility and reliability․ This guide provides step-by-step instructions to help you replace your blades effectively and maintain your mower’s efficiency․

Importance of Regular Blade Maintenance

Regular blade maintenance is crucial for ensuring clean cuts, preventing grass damage, and extending mower lifespan․ Dull or damaged blades can tear grass, leaving it vulnerable to disease․ Sharp blades improve cutting efficiency and reduce mower strain, lowering fuel consumption and emissions․ Replacing worn blades promptly maintains optimal performance and protects your investment․ Proper maintenance also enhances safety by preventing loose or damaged blades from causing accidents during operation․

Benefits of Using OEM Cub Cadet Blades

OEM Cub Cadet blades ensure precise fitment, optimal performance, and durability․ They are designed specifically for your mower, guaranteeing consistent cutting quality and longevity․ OEM blades are made with high-quality materials, reducing wear and tear on your mower’s engine and deck․ Using genuine parts maintains your mower’s warranty and prevents compatibility issues․ This ensures safer operation, better cutting results, and extends the lifespan of your Cub Cadet mower, making it a cost-effective choice in the long run․

Safety Precautions

Always wear protective gear and ensure the mower is off with the battery disconnected before starting blade replacement․ Handle sharp blades with care to avoid injuries․

Essential Safety Tips Before Starting

Before starting blade replacement, ensure the mower is turned off and the battery is disconnected․ Engage the parking brake and wear protective gloves and eyewear․ Handle blades with care due to sharp edges․ Never attempt repairs while the mower is running or in motion․ Keep children and pets away from the work area․ Use jack stands for added stability if lifting the mower deck․ Always refer to the Cub Cadet manual for specific safety guidelines․

Protective Gear Recommendations

Wear sturdy gloves to protect hands from cuts and abrasions when handling blades․ Safety glasses or goggles are essential to shield eyes from debris․ A dust mask can prevent inhalation of particles during blade removal․ Steel-toe boots or sturdy footwear provide protection from heavy objects․ Long sleeves and pants help prevent skin exposure to sharp edges․ Ensure all gear fits properly to maintain dexterity and visibility throughout the replacement process․

Precautions for Handling Sharp Blades

Always handle sharp blades with extreme care to avoid injuries․ Use gloves and eyewear to protect yourself from potential cuts or flying debris․ Never touch the cutting edge with bare hands, as blades remain sharp even when dull․ Store old blades in a secure, covered area to prevent accidents․ Keep children and pets away during replacement․ Properly dispose of old blades by wrapping them in cardboard or heavy-duty materials before discarding․

Preparation

Gather all necessary tools and materials, including wrenches, sockets, and replacement blades․ Prepare the mower by setting the deck height to its lowest position for easy access․

Gathering Tools and Materials

To replace Cub Cadet blades, gather essential tools: a 3/8-inch socket, wrench, gloves, and safety glasses․ Ensure you have new OEM blades, a torque wrench, and a blade spindle if needed․ Collect a wooden block or clamp to secure the blade during removal․ Check your owner’s manual for model-specific tools․ Having all materials ready ensures a smooth and efficient blade replacement process, minimizing downtime and potential safety risks․

Preparing the Mower for Blade Replacement

Begin by setting the mower deck to its lowest height to access the blades easily․ Turn off the engine and engage the parking brake․ Disconnect the battery to prevent accidental start-ups․ Remove the ignition key and ensure all safety switches are disabled․ Clear the surrounding area of debris and obstructions․ This preparation ensures a safe working environment and prevents potential hazards during the blade replacement process․

Disconnecting the Battery and Safety Switch

Always disconnect the battery before starting blade replacement to prevent accidental engine start-up․ Locate the battery, typically found under the seat or in the engine compartment․ Remove the negative terminal first, then the positive, using insulated wrenches․ Engage the parking brake and disable the safety switches to ensure the mower remains stationary․ This step is crucial for ensuring personal safety and preventing potential injuries during the replacement process․

Removing the Mower Deck

Start by lowering the mower deck to its lowest setting for better access․ Remove the belt covers and deck pins to detach the deck from the mower․ Use appropriate tools to safely lift and set aside the deck for blade replacement․

Step-by-Step Guide to Removing the Deck

First, lower the mower deck to its lowest setting to ensure easy access․ Next, locate and remove the belt covers by unscrewing the bolts or clips․ After removing the covers, use a wrench or socket to take out the deck pins․ Carefully lift the deck off the mower, ensuring it is stable․ Place the deck on a flat surface to prevent any accidental movement or damage during the blade replacement process․

Removing Belt Covers and Deck Pins

Begin by unscrewing the bolts or clips securing the belt covers using a wrench or socket․ Gently pull the covers away to expose the deck pins․ Remove the cotter pins or clips holding the deck in place․ Use a 3/8-inch socket to unscrew the deck pins, ensuring they are fully removed․ Handle the pins with care, as they may be sharp․ This step ensures safe access to the blades for replacement, maintaining mower stability throughout the process․

Safely Lifting the Mower Deck

To lift the mower deck safely, ensure the mower is on a level surface and the battery is disconnected․ Use a jack or hydraulic lift specifically designed for lawn mowers to avoid accidents․ Position the lift under the deck’s sturdy frame, ensuring even weight distribution․ Slowly raise the deck until it is accessible for blade replacement․ Always maintain control and consider using a secondary support, like a block of wood, to stabilize the deck during the process․

Inspecting and Removing the Old Blades

Inspect the blades for damage, wear, or bends․ Use gloves and tools to safely detach them, ensuring a secure and damage-free removal process․

How to Inspect Blades for Damage

Begin by removing the blades and visually inspecting them for signs of wear, bends, or damage․ Check for dull edges, uneven wear, or cracks, as these can affect cutting performance․ Ensure the blades are balanced and free from debris․ If damage is detected, replace the blades to maintain optimal mower function and safety․ Proper inspection ensures efficient and safe blade replacement․

Removing the Old Blades Safely

Disconnect the battery and ensure the mower is turned off before starting․ Use a 9/16-inch socket to loosen and remove the blade bolts․ Carefully pull the blades away from the spindle․ Handle sharp edges with gloves to prevent injury․ If blades are stuck, gently tap with a hammer․ Keep children and pets away during the process․ Properly store or dispose of old blades to avoid accidents․

Disposing of Old Blades Responsibly

Old blades should be disposed of responsibly to prevent environmental harm․ Wrap them securely in heavy-duty materials to avoid injuries․ Check local recycling centers for metal disposal options․ Do not discard blades in regular trash, as they can cause damage or injury․ Consider donating reusable blades to repair shops or community centers․ Always follow local regulations for hazardous waste disposal to ensure environmental safety․

Selecting the Right Replacement Blade

Selecting the right replacement blade ensures optimal performance․ Choose blades designed for your Cub Cadet model, verify compatibility, and purchase genuine OEM parts for reliability․

Choosing the Correct Blade Type

Selecting the right blade type for your Cub Cadet mower is crucial for optimal performance․ Blades are designed for specific cutting conditions, such as standard, mulching, or heavy-duty tasks․ Consider factors like blade thickness, angle, and compatibility with your mower model․ Ensure the blade type matches your mowing needs, whether for regular grass cutting or tackling thick vegetation․ Always refer to your owner’s manual or manufacturer guidelines to confirm the correct blade type for your specific Cub Cadet model․

Verifying Blade Compatibility

Before purchasing replacement blades, ensure they are compatible with your Cub Cadet mower model․ Check the owner’s manual for specifications or use the Cub Cadet Parts Lookup tool online․ Verify the blade size, thickness, and mounting hole configuration match your mower deck․ Compatible blades ensure proper fitment, optimal performance, and safety․ Using incorrect blades can lead to poor cutting results or damage to your mower․ Always confirm compatibility to avoid installation issues and maintain your mower’s efficiency․

Purchasing Genuine Cub Cadet Blades

Purchasing genuine Cub Cadet blades ensures optimal performance and longevity for your mower․ These blades are designed to meet exact specifications, guaranteeing a precise fit and reliable operation․ Buy from authorized Cub Cadet dealers or official online retailers to avoid counterfeit products․ Genuine blades are built with high-quality materials, offering better cutting efficiency and durability․ Always check for the Cub Cadet logo and part number verification to ensure authenticity․ This investment protects your mower and ensures superior cutting results season after season․

Installing the New Blades

Ensure the new blades are installed in the correct direction for optimal cutting efficiency․ Securely position the blades and tighten them firmly to prevent movement during operation․ Check the balance of the blades to avoid vibration and ensure safe, even cutting performance․ Always follow the manufacturer’s guidelines for proper installation to guarantee reliability and effectiveness․

Correct Installation Direction

Proper blade installation direction is crucial for efficient cutting and safety․ Ensure the cutting edge faces the direction of rotation, as indicated by the manufacturer’s markings or arrows․ Incorrect installation can lead to poor performance, uneven cuts, or even damage to the mower․ Always refer to the Cub Cadet manual or OEM guidelines for specific instructions tailored to your model․ Correct alignment ensures optimal functionality and longevity of the blades․ Adhere to these steps for a secure and effective installation․

Tightening the Blades Properly

Securely tighten the blades to prevent vibration and ensure safe operation․ Use a torque wrench to tighten blade bolts to the recommended specification, typically between 70-90 ft-lbs․ Over-tightening can damage the spindle, while under-tightening may lead to loose blades during operation․ Ensure all bolts are evenly tightened in a star pattern to maintain balance and prevent uneven wear․ Proper torque ensures stability and optimal performance of the mower․ Always refer to your Cub Cadet manual for exact torque values specific to your model․

Ensuring Blade Balance

Proper blade balance is crucial for smooth operation and even cutting․ After installation, check each blade for balance using a blade balancer or a vise․ Ensure both blades are evenly weighted and aligned․ Imbalanced blades can cause vibration, affecting performance and safety․ If necessary, adjust or replace blades to achieve balance․ Tighten all bolts securely and test the mower on a flat surface to confirm stability․ Balanced blades ensure optimal cutting results and extend the lifespan of your Cub Cadet mower․

Reattaching the Mower Deck

Reinstall the deck pins securely and reattach the belt covers․ Lower the mower deck slowly, ensuring proper alignment and function․ Tighten all connections firmly․

Reinstalling the Deck Pins

Align the deck pins with their respective holes, ensuring they fit securely․ Insert the pins and tighten them firmly to hold the mower deck in place․ Use cotter pins to secure them if applicable․ Double-check that all pins are properly seated and tightened to avoid any movement during operation․ This step is crucial for maintaining the mower’s stability and ensuring safe cutting operations․ Ensure all safety features are reactivated before restarting the mower․

Reattaching Belt Covers

Once the deck pins are secure, align the belt covers with their mounting points․ Reattach them using the original screws or clips, ensuring a snug fit․ Tighten all fasteners firmly to prevent vibration or movement․ Verify that the covers are properly aligned and seated to avoid interference with the belts or other components․ Double-check that all hardware is secure before proceeding․ Properly reattaching the belt covers protects the belts and ensures smooth mower operation․

Lowering the Mower Deck Safely

After reinstalling the deck pins and belt covers, carefully lower the mower deck․ Ensure the mower is on a level surface and use a jack or lift for support if needed․ Lower the deck slowly, aligning it with the tractor’s frame․ Once fully lowered, secure the deck pins tightly and reattach any safety switches or components․ Double-check all connections and ensure the deck is stable before reengaging the PTO or starting the mower․

Testing the Mower

Start the mower and check blade function․ Test on a flat surface to ensure proper cutting performance and alignment․ Verify the blades are operating smoothly and evenly․

Starting the Mower and Checking Blade Function

After reinstalling the mower deck, start the engine and engage the PTO to test blade operation․ Listen for unusual noises and observe blade movement․ Ensure the blades spin evenly and cut uniformly․ Check for vibrations or uneven cutting, which may indicate imbalance or improper installation․ If issues arise, stop the mower immediately and inspect the blades․ Proper function ensures efficient cutting and prevents damage to the mower or lawn․

Testing on a Flat Surface

Test the mower on a flat surface to ensure proper blade performance․ Drive in straight lines and check for even cutting․ Use a level surface to assess the mower’s ability to maintain consistent contact with the ground․ This helps verify that the blades are balanced and functioning correctly․ Any unevenness or missed spots indicate potential issues with blade installation or alignment․ Proper testing ensures optimal performance and prevents future maintenance challenges․

Ensuring Proper Cutting Performance

After replacing the blades, ensure the mower delivers clean, even cuts․ Inspect the grass to verify consistent cutting height and absence of missed spots․ Adjust the deck height or blade balance if necessary․ Test the mower on both flat and uneven terrain to confirm proper performance․ Regularly check blade sharpness and alignment to maintain optimal cutting quality․ Proper blade function prevents grass damage and promotes a healthy lawn appearance, ensuring your mower operates at its best․ Sharp blades are essential for efficient mowing and longevity of the machine․

Sharpening and Maintaining Blades

Sharpening Cub Cadet blades regularly ensures clean cuts and prolongs blade life․ Use a file or grinder to maintain sharp edges, and balance blades after sharpening for optimal performance․

Best Practices for Sharpening Blades

Sharpening Cub Cadet blades requires precision to maintain cutting efficiency․ Inspect blades for damage before sharpening and use a file or grinder to restore sharp edges․ Always sharpen at the original angle to avoid altering the blade’s design․ After sharpening, balance the blades to ensure even cutting performance․Sharpening every 25 hours of use prevents dulling and extends blade lifespan․ Proper sharpening techniques help maintain mower performance and reduce wear on the machine․

Scheduling Regular Blade Maintenance

Regular blade maintenance is crucial for optimal mower performance․ Schedule blade inspections after every 25 hours of use to check for wear and damage․ Plan sharpening sessions every 50 hours to maintain sharpness․ Replace blades annually or when severely damaged․ A consistent maintenance routine ensures clean cuts, prevents grass damage, and prolongs mower lifespan․ Use Cub Cadet OEM blades for reliable results and follow recommended maintenance schedules to keep your mower running efficiently․

Extending Blade Lifespan

To extend blade lifespan, sharpen blades regularly and avoid mowing debris like rocks or branches․ Store blades in a dry place to prevent rust․ Inspect blades after each use and clean them thoroughly․ Using OEM Cub Cadet blades ensures durability and optimal performance․ Proper storage and maintenance routines help maximize blade longevity, ensuring cleaner cuts and better mower efficiency over time․

Troubleshooting Common Issues

Common issues include blade vibration, uneven cutting, and loose bolting․ Check blade balance, tighten bolts, and ensure proper installation for optimal performance and safety․

Diagnosing Blade Vibration Problems

Blade vibration often stems from imbalanced or damaged blades․ Inspect for uneven wear, bends, or nicks․ Ensure blades are balanced and properly installed․ Check the spindle for wear or play, and verify the mower deck’s alignment and stability․ Using OEM blades and following Cub Cadet’s installation guidelines can help prevent vibration․ Additionally, maintain mower deck belts and other components, and adjust mowing techniques to reduce strain․ If issues persist, consult a professional for precise diagnosis and repair․

Fixing Uneven Cutting Issues

Uneven cutting issues can arise from dull or damaged blades, improper blade installation, or debris buildup․ Inspect and replace worn blades with genuine Cub Cadet parts․ Ensure blades are sharpened evenly and installed correctly․ Remove any debris from the mower deck and blades․ Check deck alignment and adjust if necessary․ Regularly sharpening blades and maintaining proper mower deck settings will help achieve consistent, even cuts․ Always follow Cub Cadet’s guidelines for blade care and replacement to optimize performance․

Addressing Blade Bolting Issues

Loose or corroded blade bolts can cause vibration and uneven cutting․ Inspect bolts regularly and tighten them using a torque wrench to the manufacturer’s specifications․ Apply a small amount of lubricant to prevent rust․ If bolts are stripped, replace them immediately․ Always use genuine Cub Cadet bolts to ensure a secure fit․ Avoid over-tightening, as this can damage the blade or spindle․ Consult your Cub Cadet manual for specific torque values and bolt replacement guidelines․

Proper blade replacement and maintenance are crucial for optimal performance and longevity of your Cub Cadet mower․ Always follow instructions and use genuine parts for best results․

Final Tips for Blade Replacement Success

For a successful blade replacement, always use genuine Cub Cadet parts to ensure a precise fit and optimal performance․ Follow the step-by-step guide carefully, and double-check blade installation direction․ Tighten bolts securely but avoid over-tightening․ After installation, test the mower on a flat surface to ensure smooth operation․ Regular blade sharpening and maintenance will extend the lifespan of your blades and keep your mower performing at its best․

Importance of Regular Maintenance

Regular blade maintenance is crucial for maintaining your Cub Cadet mower’s performance and longevity․ Dull or damaged blades can tear grass, leaving it vulnerable to disease․ Sharp blades ensure clean cuts, promoting healthy growth․ Additionally, worn blades can strain the mower’s engine, reducing efficiency․ Schedule blade sharpening or replacement every 20-50 hours of use to keep your mower running smoothly and your lawn looking its best․

Encouraging Proper Blade Care

Proper blade care is essential for optimal mower performance and safety․ Regularly inspect blades for damage or wear, as dull or bent blades can compromise cutting efficiency and pose safety risks․ Sharpen or replace blades as needed to ensure clean cuts and prevent grass damage․ Always follow Cub Cadet’s maintenance guidelines to extend blade lifespan and maintain your mower’s efficiency․ Proper care ensures reliable operation and a well-manicured lawn․

mandatory instruction sign

Mandatory instruction signs are critical visual communications that provide clear directives to ensure safety and compliance in various environments. They are essential for guiding behavior, preventing accidents, and promoting order in workplaces and public spaces. These signs are universally recognized and designed to be easily understood, making them indispensable in maintaining safety standards and operational efficiency.

1.1 Definition and Purpose

Mandatory instruction signs, also known as regulatory signs, are designed to inform individuals of specific actions that must be taken to ensure safety and compliance. Their primary purpose is to provide clear, unambiguous directives that help prevent accidents, maintain order, and meet legal requirements. These signs are essential in environments where adherence to rules is critical for operational efficiency and public welfare.

1.2 Importance in Workplace Safety

Mandatory instruction signs are crucial for ensuring a safe and compliant work environment. They provide clear directives that help prevent accidents, reduce risks, and promote adherence to safety protocols. By clearly communicating essential actions, these signs contribute to a culture of safety, enabling employees and visitors to understand their responsibilities. Their presence ensures that workplaces meet regulatory standards, fostering a secure and efficient operational setting while protecting individuals from potential hazards.

1.3 Common Examples of Mandatory Signs

Common examples of mandatory signs include “Put on protective gloves,” “Use eye protection,” and “Wear a hard hat.” These signs are frequently displayed in construction zones, factories, and healthcare facilities to enforce safety protocols. They often feature universally recognized symbols, such as a hand wearing gloves or a face with goggles, ensuring clarity across language barriers. Their presence is essential for maintaining compliance with safety regulations and protecting individuals in high-risk environments.

Design and Standards for Mandatory Instruction Signs

Mandatory signs follow strict design standards, including specific colors, shapes, and symbols, ensuring consistency and visibility. These standards are guided by regulations like ISO and OSHA.

2.1 Color Codes and Symbolism

Mandatory instruction signs use standardized color codes and symbols to convey clear messages. The background is typically blue, with white symbols and text, ensuring high visibility. These colors are chosen for their psychological impact, as blue fosters trust and calmness. Symbols are universally recognized and designed to transcend language barriers, making them effective in diverse environments. Compliance with these standards ensures consistency and immediate recognition, aiding in workplace safety and operational efficiency. Regulatory bodies like ISO and OSHA mandate these color and symbol guidelines to maintain uniformity and legal compliance.

2.2 Shape and Layout Requirements

Mandatory instruction signs must adhere to specific shape and layout standards to ensure clarity and recognition. The most common shape is a circle, often with a white interior and a blue border. Symbols and text are centered, with ample spacing to avoid clutter. The layout typically features a prominent symbol followed by concise text, ensuring immediate comprehension. These design elements are standardized to meet regulatory requirements, ensuring uniformity and effectiveness across all applications. Proper alignment and proportions are critical for visibility and understanding.

2.3 Text and Font Guidelines

Mandatory instruction signs require specific text and font standards to ensure readability and consistency. Text must be concise, uppercase, and sans-serif for clarity. Font sizes are typically specified in millimeters, with larger fonts for greater visibility. Colors must contrast sharply between text and background, often white on blue. These guidelines ensure uniformity and compliance with regulations like OSHA and ISO, making the signs easily understandable across diverse environments and languages. Proper typography enhances safety and effectiveness.

2.4 Size Requirements for Visibility

Mandatory instruction signs must adhere to specific size standards to ensure visibility from a distance. Typically, the size is determined by the viewing distance, with larger signs required for farther distances. For example, OSHA guidelines recommend that letters be at least 2 inches tall for every 25 feet of viewing distance. The sign’s overall dimensions must accommodate the text and symbols while maintaining legibility. Proper sizing ensures the message is clear and easily readable, enhancing safety and compliance in various environments.

Legal and Regulatory Framework

Mandatory instruction signs are governed by regulations like OSHA standards and ISO guidelines, ensuring compliance with safety protocols. These frameworks dictate design, placement, and maintenance requirements, emphasizing adherence to legal standards for workplace and public safety. Non-compliance can result in penalties, highlighting the importance of following established regulations to protect individuals and organizations.

3.1 OSHA Guidelines for Mandatory Signs

OSHA mandates specific standards for mandatory instruction signs to ensure workplace safety and compliance. These guidelines dictate the use of universally recognized symbols, consistent color schemes, and clear typography to convey instructions effectively. Employers must place signs in visible locations where hazards exist, ensuring all workers can easily understand and follow the instructions. Non-compliance with OSHA’s guidelines can result in penalties, emphasizing the importance of adhering to these regulations for a safe work environment.

3.2 ISO Standards for Safety Signs

ISO standards for safety signs establish internationally recognized design principles to ensure consistency and clarity. These standards emphasize the use of specific shapes, colors, and symbols to convey mandatory instructions universally. ISO guidelines ensure that signs are easily understood across language and cultural barriers, promoting global safety harmonization. Compliance with ISO standards is crucial for maintaining workplace safety and facilitating international communication, ensuring that mandatory signs are effective in diverse environments worldwide.

3.4 Compliance Requirements Across Industries

Compliance requirements for mandatory instruction signs vary across industries, with specific regulations tailored to workplace risks and operational needs. Industries like healthcare, construction, and manufacturing must adhere to strict standards to ensure safety and legal compliance. Signs must be designed and placed according to industry-specific guidelines, reflecting unique hazards and protocols. Failure to comply can result in legal penalties, accidents, and operational disruptions, emphasizing the importance of adapting signs to meet industry-specific safety demands.

Placement and Installation of Mandatory Signs

Mandatory signs must be placed in high-visibility areas to ensure compliance and safety. Strategic installation considers surroundings, ensuring signs are easily seen and understood. Consistent placement across facilities maintains standards.

4.1 Strategic Locations for Maximum Visibility

Mandatory signs should be placed in areas with high foot traffic, such as entrances, exits, and near specific hazards or requirements. Positioning them at eye level ensures they are easily noticeable and unobstructed. Avoid placing signs near clutter or competing visuals to maintain visibility. Strategic locations include corridors, stairwells, and near equipment requiring specific instructions. Ensure uniformity in placement across facilities to reinforce consistency and compliance with safety standards.

4.2 How to Ensure Compliance with Placement Rules

To ensure compliance with placement rules, conduct regular site assessments to identify optimal locations for mandatory signs. Refer to industry standards like OSHA and ISO for specific guidelines. Use visibility tools to confirm signs are unobstructed and legible from required distances. Document placement locations and update them during site changes. Train staff on compliance requirements and perform periodic audits to verify adherence to regulations. This systematic approach ensures ongoing compliance and effectiveness of mandatory instruction signs in maintaining safety standards.

4.3 Maintenance and Inspection Schedules

Regular maintenance and inspections are vital to ensure mandatory signs remain visible and effective. Schedule inspections quarterly to check for damage, fading, or obstruction. Clean signs to maintain legibility and replace worn-out ones promptly. Document inspection results for compliance records. Train staff to report issues and integrate maintenance into routine safety protocols. Use digital checklists to track inspections and ensure accountability. Proper upkeep guarantees that mandatory signs continue to serve their purpose in safeguarding environments and guiding behavior effectively over time.

Psychological Impact of Mandatory Signs

Mandatory signs significantly influence behavior by providing clear directives, reducing uncertainty, and fostering a sense of safety and order in various environments, enhancing overall compliance and well-being.

5.1 How Signs Influence Behavior

Mandatory signs directly influence behavior by capturing attention and conveying clear instructions, ensuring immediate comprehension. Their use of color, symbols, and concise text creates a sense of obligation, encouraging compliance. By reducing ambiguity, these signs minimize hesitation and promote orderly conduct. They also foster a subconscious adherence to rules, enhancing safety and efficiency in environments like workplaces and public spaces, where swift understanding and action are critical.

5;2 The Role of Color Psychology

Color psychology plays a vital role in mandatory signs by evoking immediate reactions and ensuring messages are quickly understood. Blue, often used for mandatory signs, signifies trust and stability. Green, commonly associated with safety, reinforces positive actions. The strategic use of color ensures visibility and grabs attention, making it easier for individuals to comprehend and follow instructions. Consistent color schemes across signs help maintain recognition and adherence, embedding safety protocols deeply into workplace and public cultures.

5.3 Design Elements That Enhance Compliance

Effective design elements in mandatory signs ensure clarity and compliance. Circular shapes, universally recognized as mandatory symbols, instantly convey importance. Simple, iconic imagery and clear text in readable fonts enhance understanding. High-contrast colors and proportional sizing ensure visibility from distances. Consistent design across signs fosters familiarity, reducing confusion. These elements work together to capture attention, communicate instructions quickly, and encourage adherence to safety protocols in diverse settings.

Mandatory Instruction Signs in Different Industries

Mandatory instruction signs are essential across industries, ensuring safety and efficiency. They guide behavior in construction, healthcare, manufacturing, and public transport, adapting to each sector’s unique needs.

6.1 Construction Sites

Construction sites rely heavily on mandatory instruction signs to ensure worker safety and operational efficiency. These signs often specify personal protective equipment requirements, emergency exit routes, and hazard alerts; They are designed to withstand outdoor conditions, such as weather and dust, while remaining highly visible. Examples include “Hard Hat Required” and “Safety Harness Must Be Worn.” Compliance with these signs is critical to preventing accidents and maintaining regulatory standards in high-risk environments.

6.2 Healthcare Facilities

Mandatory instruction signs are vital in healthcare facilities to ensure patient and staff safety. They often indicate infection control measures, such as handwashing stations or PPE requirements. Signs may also direct visitors to registration areas or restrict access to authorized personnel. Clear visual cues help prevent cross-contamination and guide emergency procedures. These signs are designed to be easily understood, even in high-stress environments, ensuring compliance with health protocols and maintaining a safe environment for all individuals within the facility.

6.3 Manufacturing Plants

Mandatory instruction signs play a crucial role in manufacturing plants by promoting safety, efficiency, and compliance with regulations. These signs often indicate safety protocols, such as PPE requirements or emergency evacuation routes. They also provide operational guidance, like machine usage instructions or hazard warnings. Clear signage helps prevent accidents, ensures adherence to procedures, and streamlines workflows. In dynamic industrial environments, mandatory signs are essential for maintaining a safe and productive workplace, protecting both employees and equipment from potential risks.

6.4 Public Transportation

Mandatory instruction signs are vital in public transportation to ensure safety, order, and passenger compliance. These signs provide clear directives, such as requiring seatbelt use, prioritizing seating for the elderly, or indicating no-smoking areas. They are designed to be universally understood, accommodating diverse languages and cultural backgrounds. Compliance with these signs helps maintain a safe and efficient transit environment, ensuring the well-being of all passengers and staff while promoting a smooth operational flow.

Technological Advancements in Mandatory Signs

Technological advancements have transformed mandatory signs through digital displays, real-time updates, and smart integration, enhancing visibility and compliance while ensuring dynamic communication in evolving environments.

7.1 Digital and Smart Signs

Digital and smart signs revolutionize mandatory instructions by offering real-time updates, interactive features, and enhanced visibility. These signs leverage technologies like LED displays, IoT connectivity, and cloud-based systems to ensure dynamic communication. They can be remotely managed, reducing maintenance costs and ensuring compliance with evolving regulations. Smart signs also integrate with sensors to provide context-aware instructions, improving safety and efficiency in workplaces and public spaces. Their adaptability makes them indispensable in modern environments where clear, timely information is critical.

7.2 Augmented Reality Integration

Augmented reality (AR) is transforming mandatory instruction signs by overlaying digital information onto real-world environments. AR-enabled signs provide interactive, 3D visual guidance, enhancing understanding and compliance. They can display step-by-step procedures, safety protocols, or emergency instructions dynamically. This technology is particularly valuable in complex settings like construction sites or healthcare facilities, where precise, real-time guidance is critical. AR integration makes mandatory signs more engaging and effective, ensuring users can access detailed information instantly, improving safety and operational efficiency.

7.3 IoT-Enabled Safety Systems

IoT-enabled safety systems integrate mandatory instruction signs with real-time data and sensors, enhancing workplace safety. These systems monitor environments, detect hazards, and update signs dynamically. For example, IoT can trigger alerts on digital signs during emergencies or provide real-time safety instructions. By connecting mandatory signs to IoT networks, organizations can ensure proactive safety measures, improve incident response, and maintain compliance with evolving regulations. This technology is revolutionizing how safety information is delivered, making it more adaptive and effective in modern workplaces.

Challenges and Limitations

Mandatory instruction signs face challenges like vandalism, weather damage, and outdated information. Language barriers and cultural differences can reduce their effectiveness, requiring careful design and maintenance.

8.1 Language Barriers

Language barriers pose significant challenges for mandatory instruction signs, as they may not be universally understood. In multilingual environments, signs in a single language can exclude non-speakers, reducing compliance and safety. Standardization efforts often struggle to accommodate diverse linguistic needs, potentially leading to misunderstandings. Additionally, translational inaccuracies can compromise the clarity of instructions, emphasizing the need for multilingual or symbol-based solutions to ensure effective communication across all audiences.

8.2 Cultural Differences in Interpretation

Cultural differences significantly impact how mandatory instruction signs are interpreted. Symbols and colors may hold varying meanings across cultures, leading to potential misunderstandings. For instance, a gesture deemed polite in one culture might be offensive in another. These disparities highlight the importance of cultural sensitivity in sign design. Standardized symbols help minimize misinterpretation, but cultural nuances often require localized adaptations to ensure clarity and compliance. Addressing these differences is crucial for effective communication and safety across diverse populations.

8.3 Vandalism and Damage

Vandalism and damage pose significant challenges to the effectiveness of mandatory instruction signs. Graffiti, theft, or intentional destruction can obscure critical information, compromising safety and compliance. Physical harm to signs, such as bending or breaking, further reduces their visibility and legibility. In public spaces, this can lead to legal and safety risks, while in workplaces, it may result in non-compliance with safety regulations. Regular inspections and the use of durable materials are essential to mitigate these issues and ensure signs remain functional and authoritative.

Case Studies and Real-World Applications

Mandatory instruction signs have proven essential in real-world scenarios, such as construction sites and healthcare facilities, ensuring compliance and safety through clear, universally understood directives.

9.1 Success Stories in Workplace Safety

Several industries have reported significant improvements in workplace safety by implementing mandatory instruction signs. For instance, manufacturing plants have seen a reduction in accidents by clearly indicating safety protocols. Construction sites have enhanced compliance with PPE requirements through visible signage. Healthcare facilities have improved infection control by displaying handwashing and sterilization instructions. These success stories highlight how mandatory signs play a crucial role in preventing incidents and ensuring adherence to safety standards, ultimately saving lives and reducing operational disruptions.

9.2 Failures and Lessons Learned

Despite their importance, mandatory instruction signs have sometimes failed to prevent accidents due to poor design or inadequate placement; For example, unclear signage in a manufacturing plant led to chemical spills, highlighting the need for clearer visuals. In a construction site, small or faded signs were ignored, resulting in safety violations. These failures emphasize the importance of adhering to design standards, regular maintenance, and employee training to ensure signs are effective and understood, ultimately preventing such incidents.

9.3 Innovative Uses of Mandatory Signs

Mandatory signs are being innovatively used beyond traditional applications, such as incorporating QR codes for real-time updates or digital screens in public spaces for emergency alerts. Interactive kiosks with wayfinding features are now common in malls and hospitals, enhancing navigation. Additionally, smart signs with environmental sensors monitor air quality, providing critical alerts. These advancements demonstrate how mandatory signs are evolving to integrate technology, improving safety and communication in dynamic environments while maintaining their core purpose of guiding and informing effectively.

Future Trends in Mandatory Instruction Signs

Future trends include smart signs with real-time updates, AI integration for personalized instructions, and sustainable materials in manufacturing, enhancing safety and efficiency in dynamic environments.

10.1 Personalized Safety Instructions

Personalized safety instructions tailored to individual roles or environments are emerging as a key trend. Technology like AI and data analytics enables signs to adapt to specific needs, ensuring relevance and clarity. Real-time updates and language preferences further enhance accessibility. This approach reduces cognitive overload and improves compliance, making safety protocols more effective. It also allows for dynamic adjustments based on changing conditions, ensuring safety measures remain proactive and aligned with evolving risks. This innovation promises to revolutionize how safety information is delivered.

10.2 Integration with AI Systems

Integrating mandatory instruction signs with AI systems enhances their functionality by enabling real-time adjustments and personalized alerts. AI can analyze environmental data to update signs dynamically, ensuring relevance and urgency. Machine learning algorithms can predict potential hazards, adapting instructions to mitigate risks. Additionally, AI-powered chatbots and voice commands can provide supplementary guidance, making safety protocols more accessible and interactive. This integration not only improves compliance but also creates a smarter, more responsive safety ecosystem for diverse environments.

10.3 Sustainability in Sign Manufacturing

Sustainability in manufacturing mandatory instruction signs involves using eco-friendly materials and processes. Recyclable materials like aluminum and PVC are increasingly popular, reducing environmental impact. Energy-efficient production methods and solar-powered signs further promote sustainability. Biodegradable options are also being explored to minimize waste. These practices not only align with global sustainability goals but also enhance the ethical appeal of safety signage, ensuring that mandatory instruction signs contribute positively to both safety and environmental conservation.

Mandatory instruction signs are vital for ensuring safety, compliance, and efficiency in various settings. Their clear directives and universal recognition make them an essential tool for preventing accidents and maintaining order, ultimately safeguarding lives and promoting operational excellence.

11.1 Recap of Key Points

Mandatory instruction signs are essential for ensuring safety, compliance, and operational efficiency in various environments. They provide clear directives to guide behavior, prevent accidents, and maintain order. Their design incorporates standardized colors, symbols, and layouts to ensure universal understanding. Strategic placement and regular maintenance are crucial for effectiveness. These signs play a vital role in workplaces, public spaces, and industries, adhering to legal and regulatory standards. Their psychological impact and technological advancements further enhance their utility in promoting safety and compliance across diverse settings.

11.2 Final Thoughts on the Importance of Mandatory Signs

Mandatory instruction signs are indispensable in promoting safety, compliance, and efficiency across various environments. Their standardized design ensures universal understanding, while their strategic placement and maintenance guarantee effectiveness. These signs not only prevent accidents but also foster a culture of adherence to rules and regulations. As industries evolve, the role of mandatory signs will expand, incorporating technology and innovation to enhance their impact. Their continued relevance underscores their importance in safeguarding lives and ensuring operational excellence.

References and Further Reading

Key references include OSHA guidelines, ISO standards, and academic studies. Practical guides offer implementation strategies and real-world examples for mandatory sign usage.

12.1 Industry Standards and Regulations

Industry standards and regulations play a crucial role in shaping the design and implementation of mandatory instruction signs. Organizations like OSHA and ISO provide detailed guidelines ensuring consistency and effectiveness. For instance, OSHA’s 29 CFR 1910.145 outlines requirements for workplace safety signs, while ISO 3864-1 establishes international standards for safety sign design. These regulations ensure that signs are universally understood, visually distinct, and meet specific design criteria, such as color codes and symbols, to maximize their impact and compliance across industries.

12.2 Academic Research on Safety Signs

Academic research on safety signs focuses on understanding their effectiveness in communicating safety protocols and influencing behavior. Studies explore how design elements, such as color, symbolism, and text, impact comprehension and compliance. Research also examines the psychological impact of mandatory signs, including how they reduce accidents and enhance workplace safety. Universities and institutions publish findings to improve sign design standards, ensuring they meet cognitive and cultural needs. This research informs updates to industry standards, fostering safer environments globally.

12.3 Practical Guides for Implementation

Practical guides for implementing mandatory instruction signs offer step-by-step instructions to ensure effective use. These guides include checklists for sign placement, compliance verification, and maintenance schedules. They also provide templates for custom signs and case studies of successful implementations. By focusing on real-world applications, these guides help organizations tailor signs to their specific needs, ensuring clarity, visibility, and adherence to safety standards. They are invaluable resources for businesses aiming to enhance safety and operational efficiency through clear visual communication.